Configure Veeam Linux proxy for Direct SAN
In this guide I will explain how to setup a backup proxy for Direct SAN with Veeam Backup and Replication version 11 using Ubuntu Linux 20.04 LTS. The guide is primarily focused on iSCSI configuration, however if you are using Fibre Channel, you can skip right to the MPIO section.
The open-iscsi package automatically assigns a name upon installation as seen in line 6 below. Get the iSCSI initiator name from the file /etc/iscsi/initiatorname.iscsi. :
|
|
If desired, you may safely change the initiator name to a more meaningful one. Please ensure that your new initiator name adheres to RFC 3721. I am going to change mine as an example.
InitiatorName=iqn.2012-06.dk.cloudio:plavpx03
As a final step, we want to ensure that we automatically connect any discovered iSCSI nodes when iscsid starts. Open up the file /etc/iscsi/iscsid.conf, and set node.startup to automatic:
#*****************
# Startup settings
#*****************

# To request that the iscsi initd scripts startup a session set to "automatic".
# node.startup = automatic
#
# To manually startup the session set to "manual". The default is manual.
node.startup = automatic
After changing the initiator name and configuring automatic node login, restart the services:
systemctl restart open-iscsi.service iscsid.service
You will now have to add the initiator name to your storage system, and allow it to access one or more volumes containing VMware datastores. My storage array has multiple IP addresses, so I will run discovery to ensure that they can all connect. First, we run it for the A-side discovery IP address:
root@plavpx03:~# iscsiadm -m discovery -t sendtargets -p 10.10.4.41
10.10.4.41:3260,15 iqn.2010-06.com.purestorage:flasharray.xyz
10.10.4.42:3260,15 iqn.2010-06.com.purestorage:flasharray.xyz
10.10.4.43:3260,15 iqn.2010-06.com.purestorage:flasharray.xyz
10.10.4.44:3260,15 iqn.2010-06.com.purestorage:flasharray.xyz
– and again for the “B side”
root@plavpx03:~# iscsiadm -m discovery -t sendtargets -p 10.10.24.41
10.10.24.41:3260,25 iqn.2010-06.com.purestorage:flasharray.xyz
10.10.24.42:3260,25 iqn.2010-06.com.purestorage:flasharray.xyz
10.10.24.43:3260,25 iqn.2010-06.com.purestorage:flasharray.xyz
10.10.24.44:3260,25 iqn.2010-06.com.purestorage:flasharray.xyz
Let us verify that the nodes are discovered properly:
root@plavpx03:~# iscsiadm -m node -o show |grep 10.10.
node.discovery_address = 10.10.24.41
node.conn[0].address = 10.10.24.42
node.discovery_address = 10.10.4.41
node.conn[0].address = 10.10.4.44
[...]
Login to the target
root@plavpx03:~# iscsiadm -m node --login
Logging in to [iface: default, target: iqn.2010-06.com.purestorage:flasharray.xyz, portal: 10.10.24.42,3260] (multiple)
Logging in to [iface: default, target: iqn.2010-06.com.purestorage:flasharray.xyz, portal: 10.10.4.44,3260] (multiple)
Logging in to [iface: default, target: iqn.2010-06.com.purestorage:flasharray.xyz, portal: 10.10.4.41,3260] (multiple)
[...]
Login to [iface: default, target: iqn.2010-06.com.purestorage:flasharray.xyz, portal: 10.10.24.42,3260] successful.
Login to [iface: default, target: iqn.2010-06.com.purestorage:flasharray.xyz, portal: 10.10.4.44,3260] successful.
Login to [iface: default, target: iqn.2010-06.com.purestorage:flasharray.xyz, portal: 10.10.4.41,3260] successful.
[...]
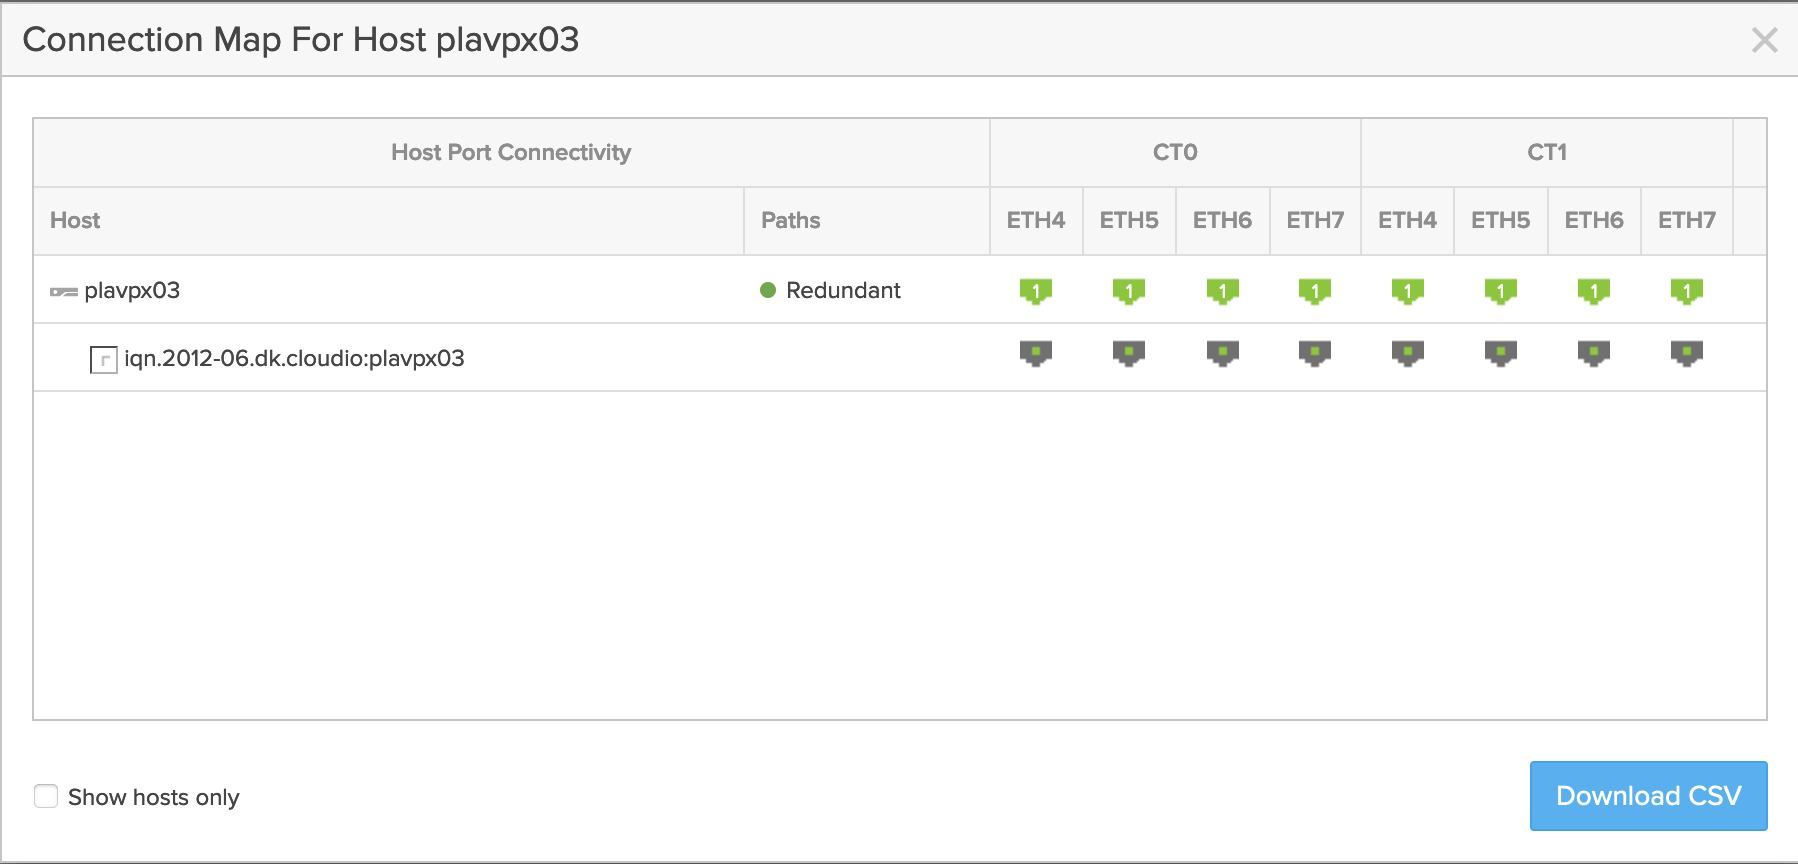
As seen from the array side, all paths are up and redundant
Configure MPIO
A final, and very important step, is to check whether multipath IO (MPIO) is properly configured. Most vendors keep a specific document describing the recommended multipath settings for Linux clients using dm-multipathd which is included with the package multipath-tools on a standard Ubuntu Focal image.
Firstly, check if MPIO is discovered correctly already, by running multipath -ll. In my case, it showed no output initially. Pure Storage keeps a very detailed document called Linux Recommended Settings, and after adding the corresponding settings to /etc/multipath.conf, I got the following output:
root@plavpx03:~# multipath -ll
3624a93701b2356d49a454c1000011617 dm-4 PURE,FlashArray
size=10T features='0' hwhandler='1 alua' wp=rw
`-+- policy='service-time 0' prio=50 status=active
  |- 34:0:0:2 sdi 8:128  active ready running
  |- 36:0:0:2 sdl 8:176  active ready running
  |- 33:0:0:2 sdc 8:32   active ready running
  |- 38:0:0:2 sdr 65:16  active ready running
  |- 37:0:0:2 sdo 8:224  active ready running
  |- 35:0:0:2 sdf 8:80   active ready running
  |- 40:0:0:2 sdw 65:96  active ready running
  `- 39:0:0:2 sdv 65:80  active ready running
3624a93701b2356d49a454c1000011616 dm-1 PURE,FlashArray
size=20T features='0' hwhandler='1 alua' wp=rw
`-+- policy='service-time 0' prio=50 status=active
  |- 33:0:0:1 sdb 8:16   active ready running
  |- 35:0:0:1 sde 8:64   active ready running
  |- 34:0:0:1 sdg 8:96   active ready running
  |- 36:0:0:1 sdk 8:160  active ready running
  |- 38:0:0:1 sdp 8:240  active ready running
  |- 37:0:0:1 sdn 8:208  active ready running
  |- 39:0:0:1 sdt 65:48  active ready running
  `- 40:0:0:1 sdu 65:64  active ready running
3624a93701b2356d49a454c10000116e9 dm-0 PURE,FlashArray
size=15T features='0' hwhandler='1 alua' wp=rw
`-+- policy='service-time 0' prio=50 status=active
  |- 33:0:0:3 sdd 8:48   active ready running
  |- 35:0:0:3 sdh 8:112  active ready running
  |- 34:0:0:3 sdj 8:144  active ready running
  |- 36:0:0:3 sdm 8:192  active ready running
  |- 38:0:0:3 sds 65:32  active ready running
  |- 37:0:0:3 sdq 65:0   active ready running
  |- 39:0:0:3 sdx 65:112 active ready running
  `- 40:0:0:3 sdy 65:128 active ready running
You can now add the proxy to Veeam Backup and Replication. As soon as the proxy is added, it will automatically discover what volumes are appilcable for Direct SAN backup.

Enjoy your fast backups!